
In the end we have 5 Docker Containers, we create them step by step, i try to keep this tutorial short as possible.
(portainer, synapse, synapse-postgres, nginx, synapse-admin)/
- Portainer is a usefull WebGui to handle and list Docker Container
- synapse is the daemon for the matrix-chat
- synapse-postgres is the database from the matrix-server
- Nginx Proxy Manager for SSL support
- synapse-admin is a WebGui to administrate Users/Media
- 1. Setup Domain and open Ports
- 2. generate the config files for synapse
- 3. create a „matrix-network“ so docker containers can talk to each other
- 4. configure the homeserver.yml
- 5. Install and use the Postgres Database Container
- 6. Now let´s install matrix-synapse by create the synapse container
- 7. install Nginx Proxy Manager
- 8. create admin user
- 9. Finaly let´s install synapse-admin to administrate users and media
- 10. additional notes
Let´s beginn the installation:
1. Setup Domain and open Ports
First register a Domain and point the IP-Address to:
„matrix.domain.org“
i use for demonstration „matrix.domain.org“ make sure to use your domain.
Open ports on your WAN device: 443/80/9000/8081
2. First generate the config files for synapse
mkdir -p ~/docker/synapse/data

docker run -it --rm -e SYNAPSE_SERVER_NAME=matrix.domain.org -e SYNAPSE_REPORT_STATS=no -v ~/docker/synapse/data:/data matrixdotorg/synapse:latest generate

cd ~/docker

sudo chown 1000:1000 -R *
Disable logging temporally (sadly a nessesary workaround during a bug, hope get solved soon) https://github.com/matrix-org/synapse/issues/9970
cat > ~/docker/synapse/data/matrix.domain.org.log.config
fill with:
version: 1

formatters:
  precise:

    format: '%(asctime)s - %(name)s - %(lineno)d - %(levelname)s - %(request)s - %(message)s'


handlers:
  console:
    class: logging.StreamHandler
    formatter: precise

loggers:
    synapse.storage.SQL:
        # beware: increasing this to DEBUG will make synapse log sensitive
        # information such as access tokens.
        level: INFO

root:
    level: INFO


    handlers: [console]


disable_existing_loggers: false
3. create a „matrix-network“ so docker containers can talk to each other
docker network create matrix-network
4. configure the homeserver.yml
add following in ~/docker/synapse/data/homeserver.yaml
suppress_key_server_warning: true
public_baseurl: "https://matrix.domain.org/"
enable_registration: true
enable_registration_without_verification: false #without "spam-protection"
You have to obtain „chaptcha“ private and public key from
https://www.google.com/recaptcha/about/
# Enable or disable reCAPTCHA for registration.
enable_registration_captcha: true

# reCAPTCHA public key (also called Site Key).
recaptcha_public_key: "Public Key"

# reCAPTCHA private key (also called Secret Key).
recaptcha_private_key: "PRIVATE KEY"

# The reCAPTCHA API siteverify endpoint.
recaptcha_siteverify_api: "https://www.google.com/recaptcha/api/siteverify"

# The URL used to present the user with the CAPTCHA.
recaptcha_form_template: "https://www.recaptcha.net/recaptcha/api.js"

# reCAPTCHA threshold score (for v3). Scores range from 0.0 to 1.0. Default is 0.5.
# Uncomment and adjust if you're using reCAPTCHA v3
# recaptcha_threshold: 0.5
final homeserver.yml should similar look like this:
# Configuration file for Synapse.
#
# This is a YAML file: see [1] for a quick introduction. Note in particular
# that *indentation is important*: all the elements of a list or dictionary
# should have the same indentation.
#
# [1] https://docs.ansible.com/ansible/latest/reference_appendices/YAMLSyntax.html
#
# For more information on how to configure Synapse, including a complete accounting of
# each option, go to docs/usage/configuration/config_documentation.md or
# https://element-hq.github.io/synapse/latest/usage/configuration/config_documentation.html
server_name: "matrix.domain.org"
public_baseurl: "https://matrix.domain.org/"
pid_file: /data/homeserver.pid
listeners:
  - port: 8008
    tls: false
    type: http
    x_forwarded: true
    resources:
      - names: [client, federation]
        compress: false

#database:
#  name: sqlite3
#  args:
#    database: /data/homeserver.db

database:
  name: psycopg2
  args:
    user: synapse_user
    password: "somePasswd"
    database: synapse
    host: synapse-postgres
    port: 5432
#  allow_unsafe_locale: false

enable_registration: true
enable_registration_without_verification: false
# Enable or disable reCAPTCHA for registration.
enable_registration_captcha: true
# reCAPTCHA public key (also called Site Key).
recaptcha_public_key: "6Lf2IscjAAAAAOwHgtQ99wd4aR4WZg_nYuvOpMYN"
# reCAPTCHA private key (also called Secret Key).
recaptcha_private_key: "6Lf2IscjAAAAALZMoSqvpgydYBGK08qeHFTg_F8S"
# The reCAPTCHA API siteverify endpoint.
recaptcha_siteverify_api: "https://www.google.com/recaptcha/api/siteverify"
# The URL used to present the user with the CAPTCHA.
recaptcha_form_template: "https://www.recaptcha.net/recaptcha/api.js"
# reCAPTCHA threshold score (for v3). Scores range from 0.0 to 1.0. Default is 0.5.
# Uncomment and adjust if you're using reCAPTCHA v3
# recaptcha_threshold: 0.5


suppress_key_server_warning: true


log_config: "/data/matrix.domain.org.log.config"
media_store_path: /data/media_store
registration_shared_secret: "GXNHkHbGWzQ@Gx&kHNCgA5Z.@^KuSo25gwKkME+5FscBH_3te-"
report_stats: false
macaroon_secret_key: "SH^+qRXl7b4j56ggBA5Pd7,~w;tD=+*9T;82wDbUtY4Ozs.jvA"
form_secret: "XR_W5NizcuNgIMqa@XdETtN_#P@qoJaJk0y#ADP&pi^QnLoQdC"
signing_key_path: "/data/matrix.domain.org.signing.key"
trusted_key_servers:
  - server_name: "matrix.org"


# vim:ft=yaml
5. Install and use the Postgres Database Container
make sure you at least change „synapse_password“
replace „sqlite3 database“ with „postgres database(psycopg2)“ or stick to sqlite3
docker run -d --name synapse-postgres --network matrix-network -e POSTGRES_USER=synapse_user -e POSTGRES_PASSWORD=synapse_password -e POSTGRES_DB=synapse -p 5432:5432 postgres:13
change PostgreSQL database collation to C instead of en_US.utf8 in Terminal
docker exec -i synapse-postgres pg_dump -U your_db_user your_db_name > backup.sql
docker exec -i synapse-postgres psql -U your_db_user postgres -c "DROP DATABASE synapse;"
docker exec -i synapse-postgres psql -U your_db_user postgres -c "CREATE DATABASE your_db_name WITH OWNER your_db_user LC_COLLATE='C' LC_CTYPE='C' TEMPLATE=template0;"
docker exec -i synapse-postgres psql -U your_db_user your_db_name < backup.sql
6. Now let´s install matrix-synapse by create the synapse container
docker run -d --name synapse --network matrix-network -p 8008:8008 -p 8448:8448 -v ~/docker/synapse/data:/data matrixdotorg/synapse:latest
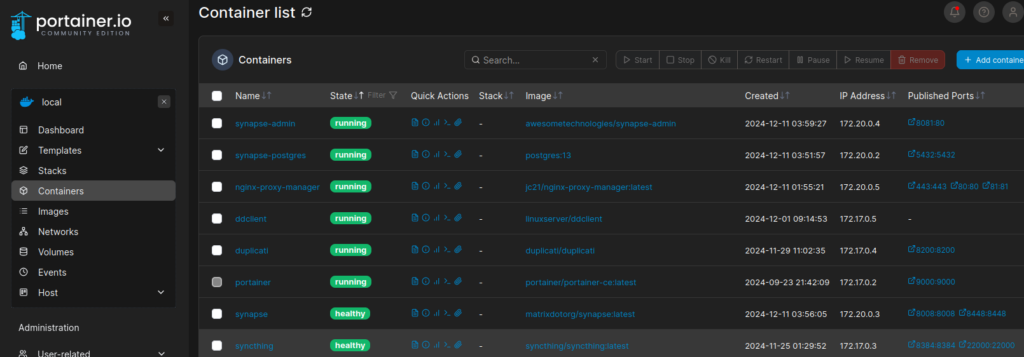
Now the matrix docker contaienr is up and running.
go to Portainer WebGui on http://YourDomain:9000
and start your Containers or check Log´s
if your run into „permission“ problems then solv this by:
cd ~/docker
sudo chown 1000:1000 -R *
sudo chmod 777 -R *
7. install Nginx Proxy Manager
create folders and run „docker run“ command
mkdir -p ~/docker/npm/data ~/docker/npm/letsencrypt
docker run -d --name=nginx-proxy-manager -p 80:80 -p 81:81 -p 443:443 -v ~/docker/npm/data:/data -v ~/docker/npm/letsencrypt:/etc/letsencrypt --restart=unless-stopped jc21/nginx-proxy-manager:latest
default login
email: admin@example.com
passwd: changeme
dont forget to change password
create the proxy_pass
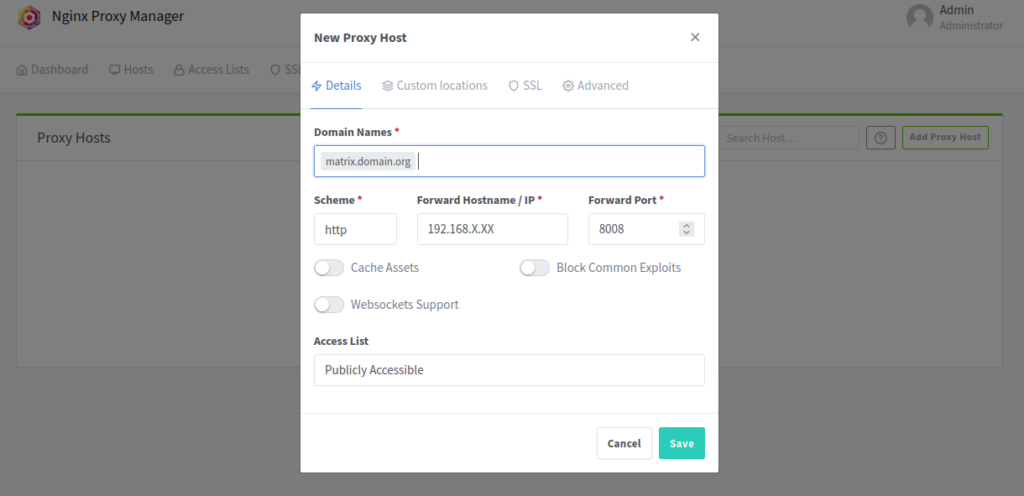
request ssl certificate
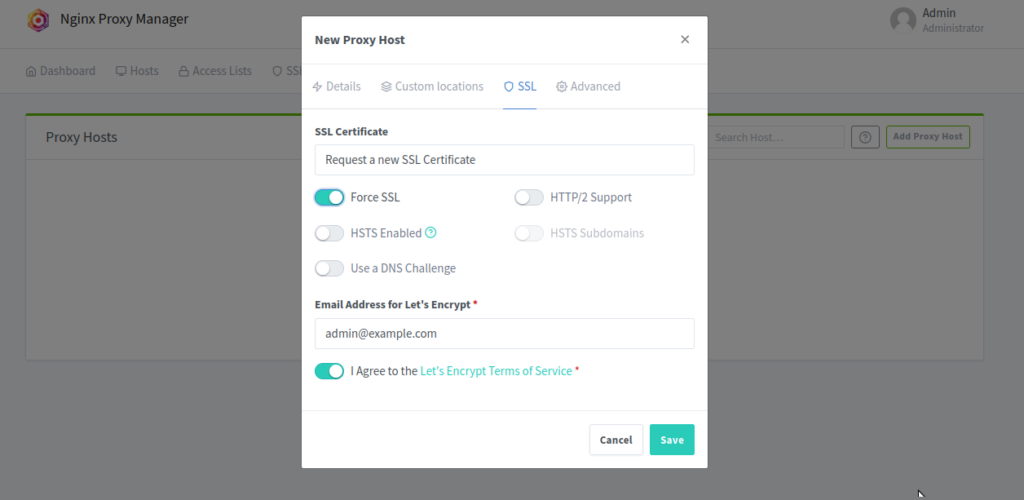
hit save and your matrix server should be available @ http://matrix.domain.org
8. create admin user
sudo docker exec -it synapse register_new_matrix_user -u admin -p somePasswd -a --admin -c /data/homeserver.yaml http://localhost:8008
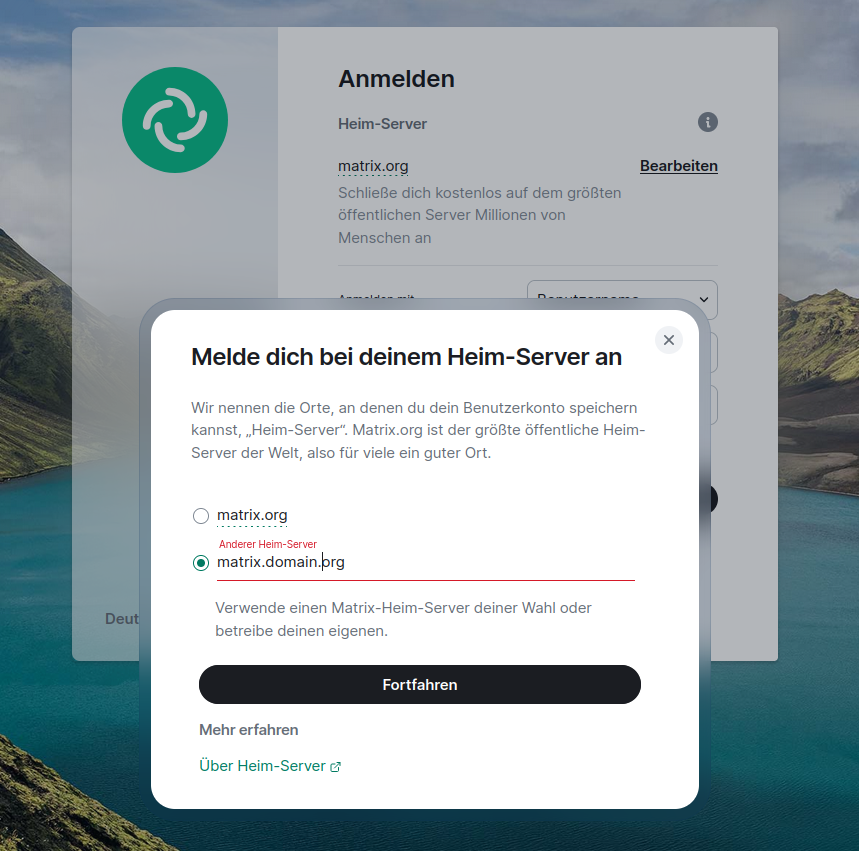
Now you are ready to login with any matrix client as admin user
or register new standard user with any matrix client
A good Client for server registration is https://app.element.io
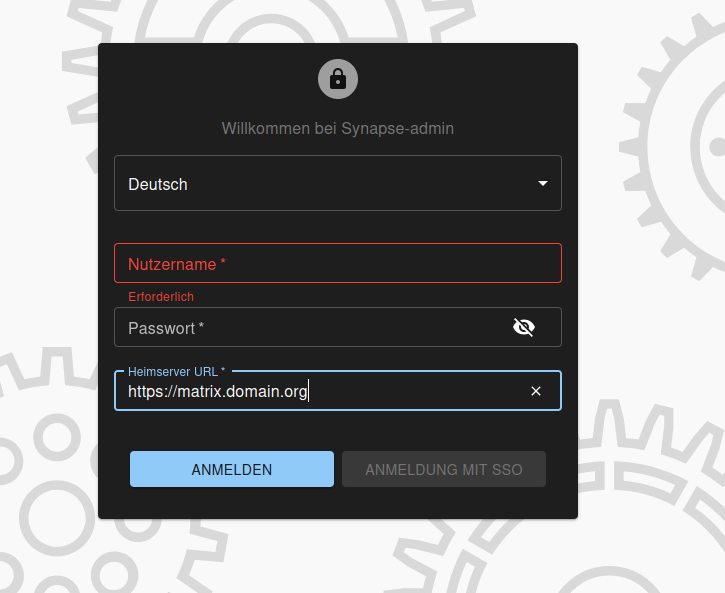
9. Finaly let´s install synapse-admin to administrate users and media
firstly we need a „ADMIN_ACCESS_TOKEN“, to get it use this command with given password from previous matrix-admin-user creation.
curl -X POST \
  -H "Content-Type: application/json" \
  -d '{"type": "m.login.password", "user": "admin", "password": "somePasswd"}' \
  http://localhost:8008/_matrix/client/r0/login
with this token we can create „synapse-admin“ docker container
docker run -d \
  --name synapse-admin \
  --network matrix-network \
  -p 8081:80 \
  --link <DEIN_SYNAPSE_CONTAINER_NAME>:synapse \
  -e SYNAPSE_SERVER_URL=http://synapse:8008 \
  -e SYNAPSE_ACCESS_TOKEN=<DEIN_ADMIN_ACCESS_TOKEN> \
  awesometechnologies/synapse-admin
<DEIN_SYNAPSE_CONTAINER_NAME> is the container name, we have used „synapse“ previosly
and <DEIN_ADMIN_ACCESS_TOKEN> is the previous generatet token
so this command should look like this now for example:
docker run -d --name synapse-admin --network matrix-network -p 8081:80 --link synapse:synapse -e SYNAPSE_SERVER_URL=http://synapse:8008 -e SYNAPSE_ACCESS_TOKEN=syt_YdtaW4_ZpApepxSwQnt45DmofCYVX_1KIeQ0 awesometechnologies/synapse-admin
now you can login into admin web interface using port :8081
Well Done!!
10. additional notes
falls du in docker ein Volumen verwenden wollen dass an einer externen Festplatte zbsp hängt kannst du den befehl „–mount“ verwenden
zum beispiel:
docker run -d --name synapse --network matrix-network -p 8008:8008 -p 8448:8448 -v ~/docker/synapse/data:/data --mount type=bind,source=/media/1TerraHDD/matrix/media_store,target=/data/media_store matrixdotorg/synapse:latest
falls du den „Nginx Prox Manager“ nicht verwenden willst kannst du auch den „Nginx docker container verwenden“
It is time to install Nginx Docker Container, create SSL Certificates and write an reverse proxy from port 8008 to 443
sudo apt update

sudo apt install certbot python3-certbot-nginx

sudo certbot certonly --standalone -d matrix.domain.org
follow the wizard to create the certificate
write the reverse proxy nginx container && create folders
mkdir -p ~/docker/nginx/conf.d
docker run --name nginx-reverse-proxy --network matrix-network -p 443:443 -v ~/docker/nginx/conf.d/:/etc/nginx/conf.d/ -v /etc/letsencrypt/live/matrix.domain.org/fullchain.pem:/etc/letsencrypt/live/matrix.domain.org/fullchain.pem -v /etc/letsencrypt/live/matrix.domain.org/privkey.pem:/etc/letsencrypt/live/matrix.domain.org/privkey.pem -d nginx
insert the following in default.config file
nano ~/docker/nginx/conf.d/default.conf
server {
    listen 443 ssl;
    server_name matrix.domain.org;
    ssl_certificate /etc/letsencrypt/live/matrix.domain.org/fullchain.pem; # managed by Certbot
    ssl_certificate_key /etc/letsencrypt/live/matrix.domain.org/privkey.pem; # managed by Certbot
    location / {
        proxy_pass http://synapse:8008;
        proxy_set_header Host $host;
        proxy_set_header X-Forwarded-For $remote_addr;
    }
}
Schreibe einen Kommentar
Du musst angemeldet sein, um einen Kommentar abzugeben.